Jupyter notebook மற்றும் Python இல் machine learning படிக்க தொடங்குவதற்கு இந்த post ஐ படிக்கவும்

Machine learning ஐ படிக்க தொடங்குவதற்கு முதலில் நாம் Jupyter notebook ஐ தெரிந்துக் கொள்ள வேண்டும். நீங்கள் இதை Arvin Education YouTube Channel வாயிலாகவும் தெரிந்து கொள்ளலாம்.

Jupyter notebook என்றால் என்ன ?

Jupyter notebook என்பது ஒரு Open source web application ஆகும். இது code, narrations மற்றும் equations எழுதுவதற்கும் மற்றும் visualizations செய்வதற்கும் பயன்படுகிறது.

இப்பொழுது Jupyter notebook ஐ எப்படி Start செய்வது என்பதை பார்க்கலாம்.

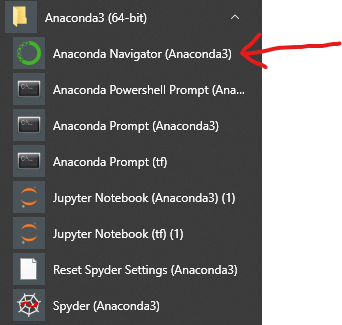
முதலில் Start button ஐ அழுத்தி Anaconda3 (64-bit) > Anaconda Navigator (Anaconda3) என்ற Option ஐ கீழே உள்ள Screenshot போல Select செய்யுங்கள்.

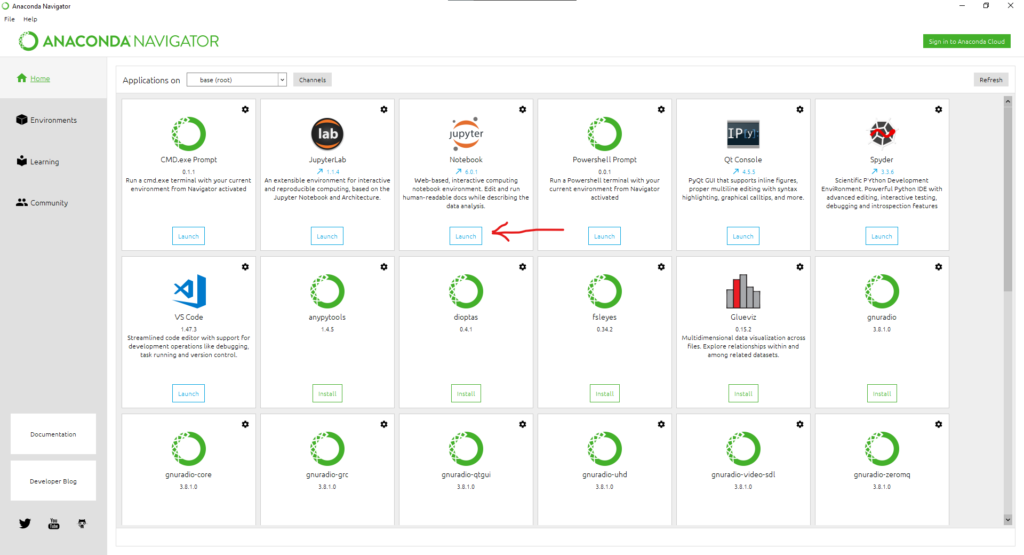
Anaconda Navigator Open ஆனவுடன் அதில் கீழே உள்ள Screenshot போல Launch button ஐ Click செய்யுங்கள். இப்பொழுது Jupyter notebook start ஆகி விடும்.

Jupyter notebook start ஆனவுடன் கீழே உள்ள Screenshot போல இருக்கும்.

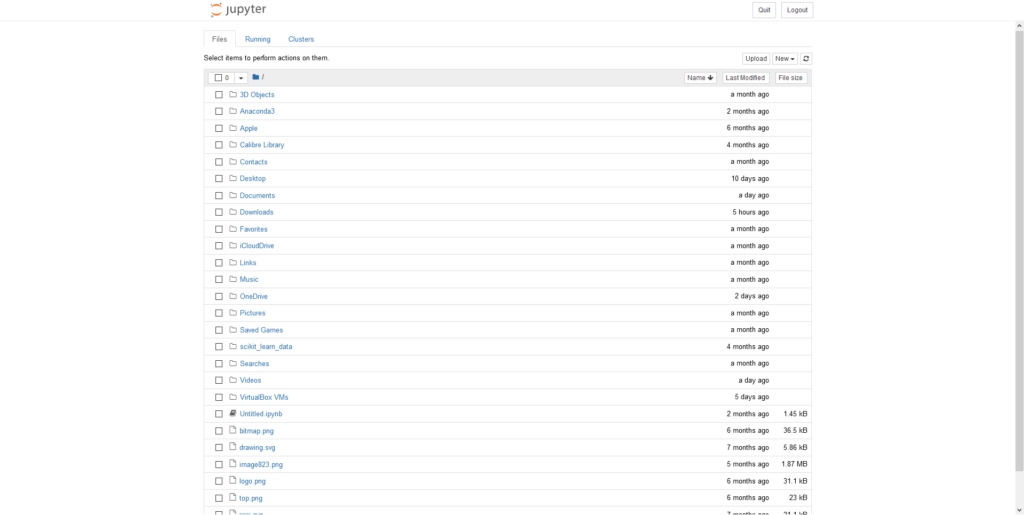
இது Jupyter notebook இன் File explorer section.இதில் உங்களுக்கு பிடித்த Folder ஐ Select செய்து கொள்ளவும்.அதன் பிறகு New button ஐ Click செய்து python 3 என்ற option ஐ Select செய்யவும்.

இப்பொழுது ஒரு புது Notebook உருவாகிவிடும். அது கீழே உள்ள Screenshot போல இருக்கும்.

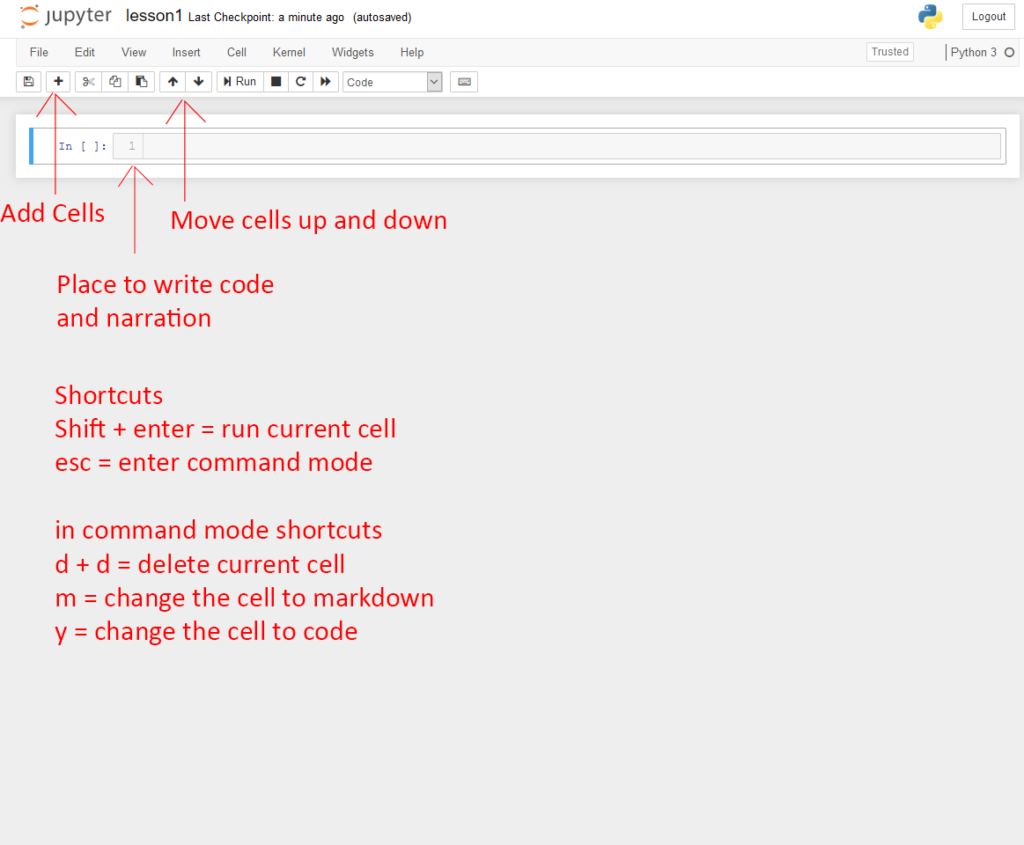
மேலே உள்ள screenshot இல் Jupyter interface பற்றி தெளிவாக ஆங்கிலத்தில் குறிப்பிடப்பட்டுள்ளது. இதில் உள்ள Shortcut களும் ஆங்கிலத்தில் குறிப்பிடப்பட்டுள்ளது. 

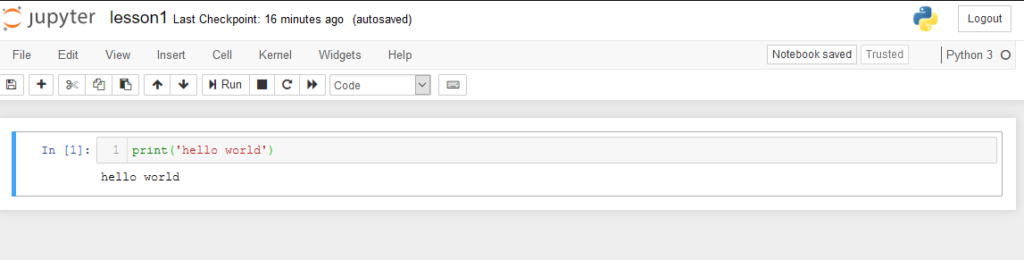
நாம் இப்பொழுது ஒரு Basic Python program ஐ பார்ப்போம். கீழே உள்ள Code ஐ Copy செய்து Cell இல் Paste செய்யுங்கள். 

print('hello world')

நமக்கு கீழே உள்ள Screenshot போல output கிடைக்கும்.

சரி நண்பர்களே அடுத்த post இல் variables, functions, machine learning specific packages numPy, Pandas, Sklearn, Tensorflow, Kares, பற்றி பார்போம்.

நீங்கள் இந்த post ஐ ஆங்கிலத்தில் படிக்க விரும்பினால் கீழே உள்ள Link ஐ Click செய்யவும்.

நன்றி நண்பர்களே 

இந்த Post இல் பிழை இருந்தால் மன்னிக்கவும்.

Python for machine learning: variables, datatypes

Contents

  1. Variables & Datatypes
  2. Basic program

Variables & Datatypes

Variables are basic building blocks of a programming language and it applies to python programs also. Variables hold data in memory. Python variables differ by a slight than the other programming languages. In python, variables can be declared without specifying the data type and the data type will be determined by the values assigned to the variable. for example in c++, declaring a variable “a” with the value assigned to it will be like the code below.

int a = 10;

But in python it is declared like

a = 10 #Assign the values 10 to variable a 

Note : in python “;” is not need to end the statement

Let see more examples

x = 5         # assign variable x the value 5
y = x + 10     # assign variable y the value of x plus 10
z = y         # assign variable z the value of y

As with other programming languages, variables in python is case-sensitive and can include letter, number, ( _ ) char but the variable name cannot start with a number.

Let us see how python assigns the datatype based on the values by an example program.

x = 1
print(type(x)) # outputs: <class 'int'>

x = 1.0
print(type(x)) # outputs: <class 'float'>

if we see the first line

x=1

we can see that it is a integer value and the output is displayed as

<class 'int'>

if we see the second variable declaration and ask it to print its type

x=1.0

we can see that it is a decimal number and its type is float

<class 'float'>

This applies to other data types too because python is a dynamically typed programming language and it assigns a data type to its variables based on the type of values assigned to it.

Basic Program

Let us see a basic program about declaring variables and datatypes.

x=10
y=x+12
print(y)
print("Data type of variable x and y" + str(type(x)) + str(type(y)))

d=1.2
print(d)
print("Data type of variable d is " + str(type(d)))

s = 'Arvin Education'
print(s)
print("Data type of variable s is " + str(type(s)))

The output is as follows

22
Data type of variable x and y<class 'int'><class 'int'>
1.2
Data type of variable d is <class 'float'>
Arvin Education
Data type of variable s is <class 'str'>

That is all for this post. In the next post we will see control statements in python.

Please see https://machinelearningtamil.blogspot.com/ for தமிழ் Version of this post.

Happy coding

Getting started with python and Jupyter notebook

To get started with machine learning we need to start with Jupyter notebook. You can also see this under our YouTube channel Arvin Education.

What is Jupyter notebook?

Jupyter notebook is an open-source web application which allows you to write code, use visualizations, write narrations, and write equations.

Now let us see how to work with Jupyter notebook. I will provide a screenshot for each step on how to start anaconda navigator to how to navigate Jupyter notebook and what are the features that are available in Jupyter notebook.

In windows start menu select Anaconda3 (64-bit) > Anaconda Navigator (Anaconda3) see previous posts to install Anaconda Distribution

Once you’ve clicked Anaconda Navigator you will see a windows that looks like the screenshot below

Click the launch button in the notebook section. see the screenshot above. Once you click the launch button Jupyter notebook will open in your default web browser ( Mozilla Firefox or Google Chrome).

This is the file explorer section in Jupyter. If you already have a notebook file you can browse and open it from here. The extension of the notebook is .ipynb.

Select the folder in which you want the new notebook file to be created.

In the new option, select python 3 under notebook it will open a new notebook with python 3 as the kernel.

In the screenshot above the different options are marked by red arrows and the functions of it are specified below. you can also see some useful shortcuts

Now let us write a small python program and check. Copy the below program and paste in the cell and press shift+enter to execute the current cell.

print('hello world')

you will see the result as below

In the next posts we will saw some basics of python like variables, functions, machine learning specific packages like NumPy, Pandas, Sklearn, Tensorflow, Kares, etc. This post is also available in Tamil in the below blog. Be sure to follow this blog if you want to learn machine learning in Tamil.

Blog address

https://machinelearningtamil.blogspot.com/

Python for Machine learning

In this series we will see python programming language and how we can use it for machine learning and Data Science. In this series we cover

  1. Installing Anaconda Distribution for Data Science.
  2. Basic Python programming language
  3. numPy
  4. Pandas
  5. Sklearn
  6. Basic programs for Data exploration and Data cleaning.

In the next post i will discuss about installing anaconda distribution and how to get started with Python

Essentials for learning Machine learning

To get started with machine learning we need some things.

  1. Python
  2. Pandas
  3. numPy
  4. Scikit-learn
  5. Jupyter notebooks or Jupyter Lab

You can get all these and install it manually or download Anaconda Distribution so it can set everything for you. to download anaconda click the link below

https://www.anaconda.com/distribution/

If you have any difficulty with the installation comment on the forum post below. I have setup a forum so that we can discuss all the things that are needed. To go to the forum click the link below

http://forums.arvinsoft.in/forum/viewtopic.php?f=3&t=2

Happy Learning

Photoshop-how to convert photo into a digital painting

It is amazing to convert a photo into a painting .The enthusiasm in seeing a own photo as painting will be immense
The tips and tricks may be bit hard .However when you get familiarised with it , it will be give good result and it can be adopted as a hobby.The step by step method will guide you to enrich your knowmledge in this task and start enjoying the world of photoshop.
First of all you need to install photoshop trial version or paid student version of the Adobe photoshop
Install it in your system either it can be a laptop or Desktop. this will work in windows and Mac operating systems
that’s  all Now you are ready to start your lessons
Step 1
start photoshop
open a new document
go to file meu
click place embedded file